

Capturing stunning underwater shots with your action camera is an exciting way to relive your adventures, but achieving the perfect composition can be tricky. The underwater world is dynamic, with constantly shifting light, colors, and movement. Knowing how to frame your shots effectively will make all the difference in transforming ordinary photos into breathtaking masterpieces.
In this guide, you’ll discover essential underwater photography composition tips tailored specifically for action camera users. From mastering angles to utilizing natural light, these techniques will help you create visually striking images that truly stand out. Whether you’re snorkeling in crystal-clear waters or exploring vibrant coral reefs, these tips will elevate your underwater photography game.
Understanding Underwater Photography Composition
Strong composition is the foundation of impactful underwater photography. It directs focus, balances elements, and transforms ordinary scenes into memorable visuals.
Importance Of Composition In Underwater Photography
Composition organizes your frame to guide viewers’ attention. Underwater scenes often include diverse subjects like coral, fish, or divers. Balancing these elements creates harmony. The rule of thirds works well here: position key subjects away from the center for an engaging shot. Look for leading lines, like reef edges or light beams, to draw eyes into the image. Negative space, such as open water, isolates subjects to add emphasis. Use foreground objects to add depth, making two-dimensional images feel three-dimensional.
Challenges Of Shooting Underwater With Action Cameras
Waterproof camera models offer limited controls, making precise settings harder to adjust underwater. Compensate by pre-setting modes and using natural light. Water absorbs colors—red disappears first, causing green or blue tones to dominate. Filters or editing software can correct these tones later.
Fast-moving marine life and currents demand quick reflexes. Stabilize your waterproof camera to avoid motion blur. Wide-angle lenses capture more of the scene but risk distortion if placed too close to a subject. Practice framing shots efficiently to adapt to these constraints.

Essential Tips For Better Composition
Crafting impactful underwater photographs begins with thoughtful composition. A balanced and focused image can transform your shots into captivating visual stories. Fine-tune your skills by applying these techniques for effective framing and detail.
Using The Rule of Thirds
Split your frame into nine equal sections using two horizontal and two vertical lines. Position your primary subject along these lines or at their intersections. This generates balance and keeps viewers engaged.
For instance, place a vibrant fish at a crossing point while the blue water fills the remaining spaces. This arrangement prevents your subject from appearing centered, creating a more dynamic visual.
Leading Lines and Framing Techniques
Guide the viewer’s attention using natural formations like coral branches, underwater terrains, or light rays. These lines lead the eye directly to your subject.
Frame your focus using surrounding elements, such as rocks or cave entrances. This adds depth, giving your image a structured composition that feels immersive.
Incorporating Negative Space
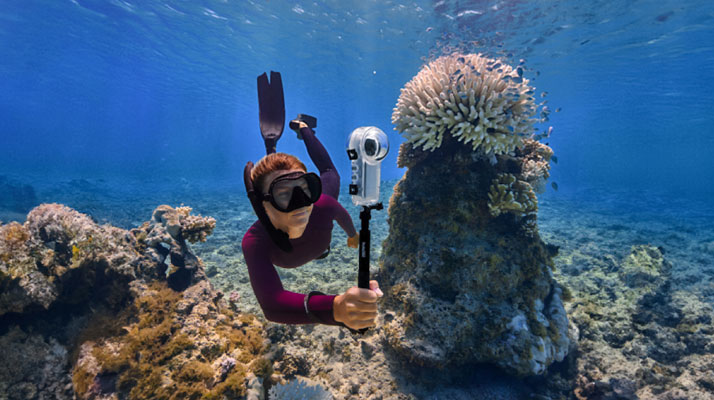
Utilize the water’s expanse—blue, green, or even black—as negative space. This empty portion draws attention to your subject and works especially well with Insta360 footage, which captures wide, immersive perspectives.

Bright-colored sea creatures like jellyfish or clownfish stand out against such backgrounds. Keep clutter minimal to simplify scenes and ensure subjects remain the focal point.
Mastering Lighting And Color Balance
Lighting and color correction influence the clarity and impact of underwater images. Water absorbs light and alters colors, demanding adjustments for accurate results.
Handling Limited Light and Murkiness
Shoot closer to the surface or during midday to take advantage of bright, natural light. Higher light levels reduce murkiness and improve depth visibility.
If the water is too dim, use an artificial light source. Position the light at an angle to avoid highlighting particles that cause backscatter. Spreading the light across the subject keeps shadows from overwhelming the shot.
Using Natural Light Versus Artificial Light
Natural light delivers lifelike tones and requires less gear. Position yourself so the sunlight highlights textures and contours in your subject. This works best in shallow regions or clear waters.
Use artificial lighting if the natural light becomes insufficient. An external light source makes colors appear more vivid and helps in darker conditions. Keep the distance balanced to prevent harsh reflections.
Balancing Color for Vibrant Results
Water filters out red, orange, and yellow tones at different depths. Adjust your camera settings before shots for underwater conditions. For accurate hues, use a red filter to counteract blue or green dominance.
Post-processing tools allow precise color enhancements. Modify white balance manually or correct specific tones to bring back authenticity to marine life and underwater landscapes.
Leveraging The Features Of Action Cameras
Action cameras often streamline underwater photography due to their compact design and specialized features. Pre-setting essential options contributes to sharper and more balanced results.
Maximizing Wide-Angle Lenses
Wide-angle lenses capture broader scenes and allow close proximity to subjects, reducing water distortion while enhancing color sharpness. To improve depth, position focal points using the rule of thirds. Incorporate leading lines from coral formations or objects like shipwrecks to guide attention. For greater visual impact, frame subjects against contrasting elements such as open water or darker backgrounds.
Optimizing Settings For Depth And Movement
Underwater shots require fine-tuned exposure levels to accommodate both light and motion. Select high shutter speeds to freeze action from active fish or divers. Use ISO carefully; adjust it to brighten scenes at depth without introducing digital noise. Positioning yourself with sunlight behind ensures light diffusion and reduces particle reflection. For split-level shots, balance exposure to capture details above and below the waterline even during bright hours.
Stabilization Techniques For Clear Shots
Underwater currents or buoyant movement can blur your footage. Stabilize the camera by holding it close to your body or mounting it onto your chest or wrist. Use slow, consistent panning to maintain clarity when tracking marine life. Incorporate features like digital stabilization along with manual techniques, such as controlled breathing and steady grip, for more uniform results. Large dome ports help stabilize split shots, ensuring a crisp frame above and below water.
Practical Techniques For Capturing Dynamic Shots
Underwater environments challenge your ability to compose engaging images. Applying specific techniques enhances action camera performance and helps create striking visuals.
Capturing Marine Life and Fast-Moving Subjects
Close proximity improves image sharpness by minimizing water interference, so approach subjects carefully without startling them.
Burst mode is useful for fast movements, taking multiple frames in seconds to freeze an ideal moment.
Position your camera low and aim upward. This perspective emphasizes the subject’s scale and creates a dramatic composition against the water surface.
Perfecting Close-Ups and Macro Shots
Every camera has a minimum focus distance. Stay within this range to maintain sharp close-ups.
To reduce camera shake and preserve detail, stabilize your camera with a handheld mount or by leveraging fixed surfaces underwater.
Focus on smaller details like coral textures or tiny marine creatures, where macro settings highlight intricate features effectively.
Composing Scenes with Environment and Context
A dome port lets you achieve split shots, capturing scenes both above and below the waterline. This form of composition adds contrast and curiosity.
Utilize natural elements like rocks or sun rays to frame your subject, creating depth and storytelling opportunities.
Bright, shallow conditions often yield balanced exposures. For evenly lit images, adjust settings to avoid overexposing brighter areas.
Conclusion
Mastering underwater photography with an action camera is all about combining technical know-how with creative composition. By applying thoughtful techniques and adapting to the unique challenges of the underwater environment, you can capture breathtaking images that truly stand out.
Whether you’re exploring vibrant coral reefs or capturing fast-moving marine life, attention to detail and practice will elevate your shots. Let your creativity flow, experiment with angles and lighting, and make the most of your action camera’s features to create unforgettable underwater visuals.