
Concealed ventilation units play a role in modern kitchen design, discreetly providing efficient air circulation. Unlike traditional ventilation systems that can mar the aesthetic of your kitchen, concealed units blend seamlessly into your cabinetry or ceiling, offering an unobtrusive solution while ensuring robust airflow.
If you’re considering installing one of these devices, understanding the installation process will help you achieve the best results. This guide offers a comprehensive overview of everything you need to know about installing concealed ventilation units, covering factors, tools required, and important installation techniques.
Understanding Concealed Ventilation Units
To fully appreciate the benefits of concealed ventilation units, it’s vital to start by understanding how they operate. These units are designed to remove smoke, odors, and grease from the kitchen, making the space more comfortable.
They work by creating a suction effect through various methods, including ducted or ductless systems. A ducted system directs air outside, while a ductless system uses filters to clean the air before recirculating it back into the kitchen.

An efficient ventilation system helps maintain indoor air quality. Poor air quality can lead to health issues, including respiratory problems. Research indicates that effective kitchen ventilation can significantly reduce airborne pollutants by up to 50%.
This advantage makes investing in a concealed unit a smart decision. When planning your ventilation installation, consider factors like noise levels, energy efficiency, and maintenance requirements. Sound levels vary between different models, and it’s advisable to choose one that operates quietly to enhance comfort in your kitchen environment.
Choosing the Right Location for Your Unit
Selecting an appropriate location for your concealed ventilation unit is critical to its functionality. Ideally, the unit should sit above the cooking surface, ensuring the efficient capture of smoke and odors. Typical placements include above stovetops or ranges, although specific designs may allow for flexibility based on your kitchen layout.

To determine the best position, start by measuring the height of your cooking surface. Most experts recommend placing the bottom of the range hood between 24 and 36 inches above a gas stove, creating an optimal distance that allows for maximum ventilation without hindering visibility or ease of cooking. You can shop for insert range hoods or various models according to your kitchen design preferences. Keep in mind that additional considerations include clearance for cabinetry and any ceiling obstructions.
If working within tight confines, use flush-mount hoods, which provide a clean look while assuring efficient airflow. After identifying the right spot, double-check your measurements and mark the area where the unit will be installed.
Tools and Materials Needed for Installation
Before proceeding with the installation of concealed ventilation units, gather all necessary tools and materials. Having everything at hand streamlines the process and minimizes potential frustrations.
Key items include a tape measure, stud finder, drill, screws, level, and a pencil for markings. Depending on the ventilation system you choose, you may need additional tools like a jigsaw for cutting cabinetry or ductwork.
High-quality materials make a difference in the outcome of your installation. Ensure you have the right type of ducting if opting for a ducted system. Flexible ducting can ease installation in tighter spaces, while rigid ducting may offer better airflow efficiency.

The hood itself should come with a user manual detailing specifications and installation instructions. It’s wise to read these materials thoroughly to avoid unnecessary mistakes. Safety gear should be on your checklist.
Items like safety glasses and gloves protect you during the installation process, and a dust mask may be beneficial for cutting activities. Once you have everything organized, you can confidently move forward with the installation process.
Preparing the Space for Installation
Preparation steps expand beyond mere location choices. Once you’ve identified where to install your unit, you must make modifications to accommodate it. Remove any cabinetry or surface material that might obstruct the installation, ensuring a clear pathway for both the unit and any ductwork.
Utilize your stud finder to locate wall studs, which will provide support for the unit once it is mounted. Mark these locations with a pencil to guide your drilling process. Drill appropriately sized holes for any mounting screws, ensuring you follow the specification provided by the manufacturer to avoid weakening the structure.
If ducting is involved, you’ll need to prepare for its installation as well. This might include running ductwork through walls or ceilings to direct air to the outdoors. Plan the duct route carefully, minimizing bends and constraints where possible, as these can impede airflow and efficiency. Always check local building codes and regulations, ensuring that your setup complies with safety standards.
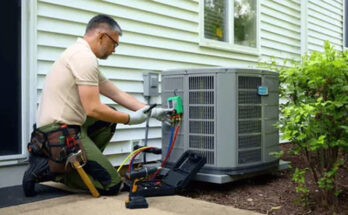
Installation and Wiring of the Ventilation Unit
Once preparation is complete, it is time for the actual installation of the concealed ventilation unit. Start by connecting any necessary ductwork if using a ducted setup. Make sure all connections are airtight to maximize efficiency. If system instructions call for it, apply duct tape or clamps to secure the joints.

For electric models, connect the electrical components according to the manufacturer’s specifications to ensure safety and functionality. Mounting the unit follows. Align it with the markings created in the previous steps, securing it to the wall or ceiling. Utilize a level to ensure it remains straight, adjusting as needed before tightening the screws completely.
Once everything is securely in place, it is important to double-check all electrical connections if the unit requires hardwiring. Lastly, conduct a test run to verify everything is operating correctly.
Turn on the unit and check for proper suction. If attached to ducting, ensure that air flows freely without excessive noise, which could indicate that something is not aligned properly. Proper installation guarantees optimal performance and longevity of your concealed ventilation unit.
Regular Maintenance Tips for Longevity
To ensure your concealed ventilation unit performs at its best, regular maintenance is vital. Regular cleaning is one aspect that shouldn’t be overlooked. Depending on usage, aim to clean filters every month. This prevents clogging and improves ventilation efficiency.
If you have a ducted model, periodically check ducts for built-up grease and dirt. Your unit’s motor and fan require routine checks. Listen for unusual sounds that may signify wear or malfunction. If you notice any irregularities, consult the user manual or a professional to address potential issues promptly.
Using high-efficiency filters may extend the time between cleanings and help improve air purification. Following manufacturer recommendations based on usage can prolong the life of your ventilation unit significantly.
Many manufacturers provide guidelines on lifespan assessments and maintenance tasks to keep your unit in top shape. Staying proactive regarding your hood maintenance ensures efficiency and enhances your kitchen’s air quality for years to come.